Module 2 of 7 · Foundation
Your home visit bag — equipment and setup
What to carry, what to leave behind, and how to set up a clean clinical space in any home.
A 12-minute read.
The bag is the first thing the patient and the family see when you walk through the door. Before you have said a word, they have looked at what you carry and decided what kind of doctor you are. That first impression sets the tone for the visit — and a thoughtful bag does most of the work for you.
Beyond first impressions, the bag is what makes a home visit a real consultation rather than a courtesy call. The same patient, examined with the same care in their living room, with the same equipment that would be available in your clinic, gets the same standard of medicine. The bag is what closes that gap.
This module covers four things — what the bag and your appearance should look like, what equipment to carry, how to set up a clean clinical space in any home, and the post-visit checklist you should run through before you leave the door. None of it is exotic. Most of it is the equipment you already own from your hospital posting or your clinic. The discipline is in carrying it consistently and using it methodically.
What the bag should look like
The bag is not a backpack. It is not a sports duffel. It is the same kind of structured, leather-look office bag that a senior consultant or a lawyer would carry into a meeting. Tan, dark brown, or black. PU leather is fine — full grain leather is a luxury, not a necessity. What matters is that it stands upright when you set it down, opens flat enough for you to find things in seconds, and has compartments so your stethoscope is not tangled with your sharps disposal.
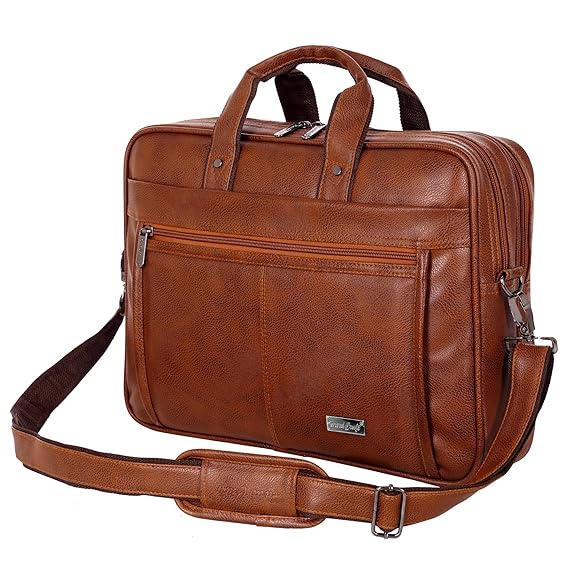
The reason for this choice is not vanity. It is the same logic as everything else in this module — the patient and the family form an impression of the standard of medicine they are about to receive within five seconds of the door opening. A doctor walking in with a clinical office bag, freshly pressed apron, and a clean name plate is a doctor whose word is going to be trusted in the next twenty minutes. A doctor arriving with a school backpack is going to have to earn that trust the hard way.
Look for a bag with at least three compartments — one main compartment for equipment, one slim front pocket for documents (prescription pad, certificate copies, consent forms), and one zipped pocket that you can reserve exclusively for biomedical waste on the way back. We will return to that compartment at the end of this module.
Your appearance — the apron and the name plate
You are not in your clinic. You are walking into a stranger's home. The signal you are a doctor — not a courier, not a salesperson, not a friend of a friend — has to be visible in the first second the door opens. Two items do that work for you.
A clean white apron. Freshly washed, freshly pressed. Long enough to come below the hip. Carried folded in the bag — put on the moment you reach the patient's building, not before. If you cannot wash it daily, carry two and rotate. A stained apron from a previous visit, however lightly stained, is worse than no apron — it suggests the doctor does not care about the patient now sitting in front of them. Many home visit doctors prefer a half-coat or a clinical jacket over a full apron, which is fine — same rule applies, clean and pressed.
A name plate or photo identification. Pinned to your apron, visible without anyone having to ask. Your name, your highest qualification, and your registration number. Many doctors print this themselves at a local stationery shop for a couple of hundred rupees and the plate lasts for years.
These two things together are worth more than any verbal introduction. A doctor in a clean apron with a clear name plate has already answered three of the family's unspoken questions before sitting down — who are you, are you really a doctor, and are you the doctor they were expecting.
The ten essential items in your bag
These ten items go in every bag, every visit, without exception. They handle the vast majority of what a general home visit will need — vitals, basic examination, common procedures, and the documentation that closes the visit.
- Stethoscope. Your own. The patient will not have one and a borrowed one is a poor substitute. A good adult diaphragm with a paediatric side is enough for general practice. Clean the diaphragm with an alcohol swab between patients in the same household.
- Blood pressure apparatus. A reliable aneroid or digital. Carry two cuff sizes if you see a mix of adults — a regular and a large adult cuff. An undersized cuff on a heavy-set patient will read falsely high, and that single bad reading can drive a wrong decision.
- Pulse oximeter. The single most useful piece of post-COVID equipment in primary care. Catches early hypoxia in respiratory illness, gives you an objective number to share with the family, costs less than a thousand rupees.
- Glucometer with strips. Carry a sealed pack of strips and check the expiry every month. In any home with a known diabetic or any case where altered sensorium is part of the picture, a quick capillary glucose is the difference between a guess and a decision.
- Digital thermometer. A simple oral or axillary digital is enough. Infrared forehead thermometers are convenient but less accurate — keep one as a screening tool only.
- Torch and otoscope. A pen-torch with fresh batteries and an otoscope with at least two clean speculum sizes. The torch alone covers throat and skin examination. The otoscope is what separates a real ENT examination from a guess.
- Tongue depressors. Disposable, wooden, several at a time. Throat examinations in homes are usually done in poor light and rushed — a depressor and a steady torch gives you what a clinic chair would.
- Reflex hammer and tendon hammer. A small combined one is fine. You will not need it on every visit, but the visit you do need it on is the one where you would have made a wrong call without it.
- Prescription pad and a writing pad. A proper printed prescription pad in your own letterhead, with your name, qualification, registration number, and contact — at least 20 sheets at all times. Also a plain writing pad for notes, drug instructions you want the family to keep, follow-up dates. The prescription is the legal output of the visit; treat the pad with the same care you treat your stethoscope. Once you are listed on JanaVaidya, a printable JanaVaidya prescription template is available for download from your doctor profile — you take colour printouts of it in bulk (50 or 100 sheets at a time) and use them as your physical prescription pad. The template carries your details, the JanaVaidya identifier, and a QR code that links back to your booking page. Until you are listed, your own printed letterhead works equally well.
- Two good pens. Black ink, the kind that does not skip on cheap paper. Two of them — one will go missing or run dry on you at least once a month. A pen that fails in the middle of writing a prescription in front of a worried family is the kind of small embarrassment that the visit does not need.
Documents you should always carry
A slim sealed plastic sleeve in the front pocket of your bag. The patient and the family will rarely ask to see these, but the day they do — or the day a building security guard or housing society asks you to prove you are a doctor — is the day you will be very glad you carried them.
- A photocopy of your medical council registration certificate. Not the original — the original stays at home. A clean photocopy is enough to establish that you are a registered doctor in good standing.
- A photocopy of your degree certificate. Same logic. Originals at home. Copies in the bag.
- A photo identity card. Your Aadhaar, voter ID, or any government-issued photo ID. Useful if you are challenged at a building gate or stopped by anyone questioning your identity en route.
- A small stack of blank consent forms. Five or six copies, folded once. For any procedure that needs explicit consent — small surgical work, injections beyond emergency use, anything the patient might later question — a signed consent form on the spot is your protection. (We will cover what counts as adequate consent in Module 7 — Medical law and ethics for home practice.)
- Your visiting card. Hand one to the patient at the end of every visit. Cheap, but immensely valuable for continuity — the family always has a way to reach you if something develops.
Once you are listed on JanaVaidya, a printable JanaVaidya doctor ID card will also be available from your doctor profile — you can carry it alongside these documents as additional verified identification. We are adding this feature soon.
One more benefit of being listed on the platform worth mentioning here: the soft copies of every prescription you upload, every consent form you record, and every medical certificate you issue are stored inside the JanaVaidya app for the legally required retention period — five years from the date of the visit. Both you and the patient have access. You do not need to keep your own physical archive of these documents for years, in cardboard files in your clinic cupboard. If a Medical Council inquiry, a tax review, or a court request ever comes asking for the record of a visit you did three years ago, you log in, find the patient, and produce the record in thirty seconds. If you are not on JanaVaidya, you have to build that archive system yourself — which is doable, but is one more thing to manage. We will come back to this in Module 3 — Documentation at home — with the legal detail of what counts as adequate record-keeping under Indian medical law.
Optional additions, by patient mix
Beyond the core eight, what else goes in your bag depends on the kind of patients you see most often. Carry these only if your practice mix justifies the weight.
If you see paediatric patients
- A paediatric stethoscope head, or a separate paediatric stethoscope
- A weighing scale or a baby weighing sling (digital, foldable)
- A measuring tape for head circumference and length
- A small box of stickers — a real, kind-hearted bribe that turns a screaming child into a cooperative one in thirty seconds
If you see elderly patients
- A geriatric-friendly pen torch (slower fading bulb)
- A monofilament for diabetic foot screening
- A small wound dressing kit for pressure sores
- Reading glasses for the patient to use during medication review — many elderly patients cannot read the prescription label on their own bottle, and you cannot review what they cannot see
Disposables and consumables
Carried in a separate inner pouch, replenished after every visit. These are the things you will absolutely use, run out of without noticing, and not have when you need them most.
- Alcohol swabs — a fresh pack every week. Used between every patient and before any injection
- Cotton balls and small gauze pieces
- Disposable gloves — two pairs minimum per visit (one for examination, one spare). Sterile gloves separately if you do any procedures
- Surgical mask and one N95 for respiratory cases
- Sterile disposable syringes and needles — at least two 2-ml syringes, two 5-ml syringes, and assorted needle gauges. Even if you carry no routine drugs, you still need syringes available for the moment you have to give an emergency injection (adrenaline, hydrocortisone)
- A small sharps disposal container or a thick-walled small bottle for used needles. Never throw used needles into a regular bin. More on this in the biomedical waste section below
- Adhesive bandages in two sizes
- Hand sanitiser — keep one in the bag and one in your pocket
Drugs to carry — and what not to
This is where many doctors over-pack and end up carrying a small pharmacy. The right answer is the opposite. Carry a small emergency kit that buys you time, and let the family pick up the actual treatment from a real pharmacy.
What to carry, for true emergencies only:
- Injection adrenaline — for anaphylaxis
- Injection hydrocortisone — for severe allergic reaction
- Injection chlorpheniramine or pheniramine — for moderate allergic reaction
- Sublingual nitroglycerine — for suspected angina while waiting for transfer
- Oral glucose or glucose gel — for hypoglycaemia
- Salbutamol metered-dose inhaler — for an acute asthma episode
What not to carry:
- Routine antibiotics — write the prescription, let them buy
- Antihypertensives, antidiabetic medications — same
- Narcotics or scheduled drugs — never. Carrying these without proper licence is illegal and exposes you to serious risk
- Vaccines requiring cold chain — the home is not a cold chain
- Anything past expiry — check your emergency kit every month
The reason for this restraint is medico-legal. A doctor who arrives with a small pharmacy in their bag and dispenses medicine on the spot is, in the eyes of the law, doing something quite different from a doctor who consults and prescribes. The first opens questions about pharmacy licensing, drug schedules, billing, and the quality control of the supply chain. The second is a clean professional act. Keep yours clean.
If you draw blood or do procedures at home
This section applies only to doctors who are comfortable performing minor procedures or drawing blood samples in the home environment. If you do not do these — and many home-visit doctors choose not to — you can skip the equipment below entirely. There is no expectation that every home-visit doctor must offer phlebotomy or in-home procedures. Most do not, and that is a perfectly defensible practice.
If you do, carry the following in a separate small pouch within the bag, sealed and only opened when needed.
For drawing blood samples
- Vacutainer needles and holders, or butterfly needles with adaptors
- Vacutainer tubes in the colours your reference lab requires — purple top (EDTA, for CBC), red or gold top (serum), blue top (citrate, for coagulation), grey top (fluoride, for fasting glucose)
- A small disposable tourniquet — never reuse
- Sterile gloves, fresh pair per draw
- Cotton balls and a small adhesive bandage for the puncture site
- Sample storage and transport — a small insulated pouch with two cold-pack inserts if samples need to remain cool until they reach the lab. Plan the route from home to lab in advance; do not let the sample sit for hours in your bag at room temperature
- A consent form for blood collection — signed by the patient before the needle is uncapped
- A copy of the lab requisition slip the family can take to the lab if you do not collect the sample yourself
For minor procedures
- A sterile procedure pack with the basics — gauze, drape, antiseptic solution
- Lignocaine and a fresh syringe if you are likely to need local anaesthesia
- Sterile suture material and a needle holder for any wound that genuinely needs stitching at home (the threshold here should be conservative — most wounds in a home setting are better sent to a clinic)
- A signed, dated procedure consent form for every procedure, without exception
Be honest with yourself about which procedures genuinely belong in a home setting and which do not. The standard is: if you would not be comfortable doing this procedure with the same equipment in a small village clinic, you should not be doing it in a Bengaluru living room. Refer when in doubt.
Biomedical waste — what comes back with you
Nothing that came out of you, or out of the patient at your hands, gets left behind in the home. Used needles, used gloves, used cotton, blood-soaked gauze, anything contaminated — all of it travels back with you, in a sealed, dedicated compartment of your bag, until you can dispose of it properly through your clinic's biomedical waste contractor or a recognised biomedical waste disposal service.
Build this into your bag from day one. The principle is straightforward:
- A puncture-proof sharps container. A small purpose-built sharps box, or a sturdy thick-walled plastic bottle that you mark clearly with "SHARPS". Every used needle goes in here, immediately after use, in front of the family. Never recap a used needle. Never leave a used needle on a table for a family member to pick up.
- A sealed yellow or red biohazard bag. The standard colour-coded biomedical waste bags (yellow for infected non-sharp waste, red for contaminated plastic) — used gloves, blood-stained cotton, contaminated swabs, used masks from an infectious case. A roll of these bags lasts months.
- A dedicated waste compartment in your bag. Reserve one zipped pocket for these two items only. It should not contain anything else. Some doctors line this compartment with a fresh outer bag at the start of each day for an extra hygiene barrier.
When you reach home or your clinic, the contents go into your standard biomedical waste collection — handed to the registered contractor or disposed of through the channel your hospital, polyclinic, or registered medical practice uses. Under the Bio-Medical Waste Management Rules 2016 (as amended), every doctor generating biomedical waste is responsible for proper disposal, with documentation kept for at least three years. Patients' homes are not exempt — the law follows you, whether the needle was used in a hospital, a clinic, or a bedroom.
If you do not currently have a biomedical waste disposal contract, set one up before you do your first home visit. Most cities have small operators that pick up from independent doctors at a reasonable monthly cost. This is non-negotiable infrastructure.
Setting up a clean clinical space — in any home
You will be examining the patient in their bedroom, their living room, sometimes their kitchen. The space is not yours. It will be cluttered. The lighting will be wrong. There may be a television playing. A child may be staring at you the entire time. None of this changes what you need.
In the first two minutes of arriving, do these four things, in this order.
- Find a flat, hard surface for your bag. A table, a chair, even a folded towel on the floor. Never put your bag on the patient's bed or on a soft surface. It contaminates the bag and it looks unprofessional. Ask politely if you need to clear space — most families will rush to help.
- Wash or sanitise your hands. Within sight of the family. This is the single most visible signal that you are practising medicine, not making a social call. Ask for soap and water if you would prefer; use your own sanitiser if the situation calls for it.
- Position the patient correctly. The patient must be sitting or lying in a way that lets you actually examine them. Move pillows. Open a window. Ask the family member playing music to lower it. You are not being rude — you are protecting the quality of the consultation.
- Manage the audience. Family members are usually well-meaning but often crowd the patient. Politely ask for one or two people to stay close and the rest to wait outside the room. The patient deserves space to answer honestly, particularly about anything personal.
The post-visit checklist — before you leave
The five minutes after the prescription is written and before you walk out the door are where most of the work-of-the-mind happens. Run through this list every time. It becomes muscle memory after thirty visits.
- Hand the prescription to the patient or the primary carer. Walk them through it line by line. Confirm they can read your handwriting, or print and hand them the printed version. Show them which medicine is for what.
- Repeat the most important instruction twice. Pick the one thing the family must do right — when to start the antibiotic, when to recheck the fever, when to come back if breathing worsens — and say it twice, in two different ways.
- Give them a clear plan for follow-up. "Call me by tomorrow evening either way." Or "Come back to me if the fever has not settled by Friday." Or "Get this blood test done in two days and send me the report." Vagueness here is the most common source of complaint later.
- Tell them what counts as an emergency. Explicitly. "If the breathing gets worse, do not wait for me — call 108 or go to the nearest hospital immediately." Many patients delay because they assume that since they have already seen a doctor, they should wait. Disabuse them of this notion.
- Collect your equipment, clean it, repack the bag. Stethoscope wiped, thermometer cleaned, glucometer strip disposed of, used gloves in your sharps bag, hand sanitiser used again. Do not leave equipment behind.
- Settle the consultation fee. Hand over your bill — a proper bill with your name, qualifications, registration number, and the amount. (Module 6 — Building home visit into your practice — covers what the bill should look like and why issuing one matters.) The family will respect you more for being professional about money than for being shy about it.
- Thank the family and the patient. Walk out calmly. The way you leave is part of the consultation. Hurried departures undo good consultations.
A note on bag hygiene
Your bag will visit dozens of homes a month. Some of them will be homes with active infection. None of these patients should pass anything on to the next via your equipment.
- Wipe the bag's hard surfaces — the outside, the handles — at the end of every day
- The stethoscope diaphragm gets an alcohol swab between patients in the same household
- The thermometer probe gets cleaned between every patient, every time
- The pulse oximeter finger clip gets a quick wipe
- Wash the bag's outer fabric every fortnight if it is washable; if not, a thorough surface clean
- Replace anything that has touched a clearly infectious case — discard, do not reuse
A reminder for every home visit doctor: For chest pain, severe breathing difficulty, stroke symptoms, accidents, or any life-threatening situation, the answer is never a home visit. Tell the family to call 108 or go to the nearest hospital immediately. Your role is to recognise these moments and redirect — quickly, calmly, and without ambiguity.
The bag is the foundation, not the medicine
Everything in this module is about preparation. The medicine itself — what you diagnose, what you prescribe, when you escalate — is yours, drawn from your training, your registration, and the patient sitting in front of you. JanaVaidya does not make those decisions and never will.
What we can do is make sure that when you do walk into a home, the practical side of the visit — the equipment, the documentation, the legal framework, the patient who is expecting you — is already taken care of. The rest is the practice itself, the part you are already trained to do.
Ready to put this into practice?
JanaVaidya brings home visit patients directly to you, with verified booking details, signed consent, and a documented record of every visit. The bag is yours; the patient flow is ours.
Apply to join JanaVaidyaNext in the Academy
Module 3 — Documentation at home